 so you want to learn how to make a chocolate rose?
Hey hey! I know you're back here for that Chocolate Rose Tutorial...
So you wanna impress your friends and neighbours? Make a cake/cupcake and top it off with a few of these chocolate beauties and they'll be oohing and aahing. In fact, you'll be oohing and aahing. It's so easy!
Are you excited yet?
Have you been playing with your big wad of chocolate plastic since my Mini Chocolate Pumpkin Tutorial?
People have been asking me if they could use white chocolate. Of course you can use white chocolate! You can also tint it with food colouring if you wish too! Do whatever your little hearts desire! The fun part is fooling around with chocolate, in my opinion. You could make so many little figures with it! Just imagine the possibilities!
It wasn't easy taking pictures while working with the Chocolate Plastic. I had a bit of chocolate gunk on my hands and lighting wasn't so good. I had to take the shot balancing the camera in my right hand while holding the rose in my left most of the time. I was too lazy to whip out my cumbersome tripod. I was doubly lazy when I thought of having to move all my gear down to my cheapie cardboard box food porn "studio" downstairs. I ended up photographing everything at the kitchen table.
Remember to have fun with this Chocolate Plastic. I love the stuff. My daughter pops those little chocolate pumpkins in her mouth and exclaims how yummy they are. Fondant is pretty, but Chocolate Plastic is tastier!
There were a lot of pictures in this step-by-step tutorial. There was also a lot of me fiddling with the chocolate plastic, putting it down, picking up the camera, swearing 'cause of the crappy lighting and taking the shot anyway. I'm sure you'll understand...food is my passion and teaching is my occupation. Photography is neither. I know why they call it "F-stop" now. There was a lot of me stopping to mutter the F word.
CAKEBRAIN'S CHOCOLATE ROSE TUTORIAL:
Please check out my Mini Chocolate Pumpkin Tutorial post for the recipe & storage instructions for the Chocolate Plastic.
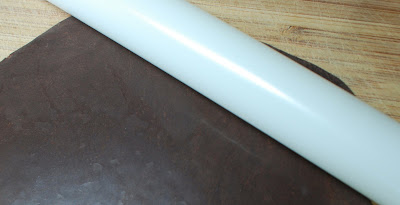 Roll a handful of chocolate plastic into a ball. I have a plastic-lined board from my Wilton decorating kit
 Using a small circle cutter about 1 inch in diameter, cut out 15 circles.
 I used my a cutter from my Wilton flower decorating kit
  Take a small chunk of the remnants left from cutting the circles and create a small ball about the size of a marble.

Create a teardrop shape from the ball. Just bring one end to a point. This part of the rose will be your base on which to build the petals. Don't make your base too big or you'll be in trouble later.
 Take each circle and, using primarily your thumbs and index fingers, flatten it into petal shapes so that the edges are thinner at the edges. I just rotate the petal while flattening the edges. Don't overwork it and don't try to make it look perfectly circular. Learn to love little imperfections.
 1st row of petals (3 petals required): taking one of the prepared petals, wrap the teardrop base so that the tip is mostly hidden. You should be only be able to see a bit of the tip of the teardrop when looking from the top of the rose. Take another petal and overlap the first wrapped petal. This picture shows what you'll have with 2 petals wrapped around the base. Take the third petal and again, overlap the last petal you applied to the base.
 2nd row of petals (5 petals required): the key to the second row of petals is that these should stand straight up whereas the first row were wrapped towards the centre. Wrap each of the 5 petals one by one; overlapping the preceding one. Continue in this manner until all 5 are attached. Use your fingers or a cotton swab to adjust the position of the petals, if you wish. This picture shows the first petal applied for the second row.
 This picture shows the second row of upright petals.
3rd row of petals (7 petals required): the third row of petals should be curved slightly. Attach each petal as in the previous steps, using your fingers to gently curve the edges outwards. Form each petal one at a time or you'll have the petals sticking to each other in a mangled mess.
 This picture shows the rose with the third row of petals almost finished (with 3 curved petals applied). Adjust the third row of petals to look as natural as possible.
The finished chocolate rose will be unique. It's almost impossible to make all your roses look the same. This is a good thing though because it'll look more natural. You can make some roses look like buds, and have others fully blossomed, like the one above. Make your chocolate rose leaves from the leftover chocolate plastic.
Have fun! Tell me how it goes!
75 comments:
You are too modest-- the photography and the how-to is very informative and nicely done. Good job. Maybe I should decrease the amount of corn syrup. Or maybe white chocolate is just too different. About how many roses can you make per pound of chocolate?
Mark,
I think you're right about the amount of corn syrup being different. I seem to recall that for white chocolate, you have to decrease by about half the amount of corn syrup. I'll have to look that up somewhere. It's in one of my hundreds of cookbooks! This recipe was halved from the original and it makes about 12 fully blossomed roses including leaves and some room for (eaten) mistakes. You can make rosebuds and/or make the roses smaller and get more I suppose.
Great tutorial :) I'd like to try this, maybe as a cupcake topper. I doubt mine will look anywhere close to yours though, and I wonder if I would have the patience to even make more than one ;P
Thanks for the elaborate tutorial. Remind me of flower making class back in school. :D
LOVELY! Thanks for the tutorial! Your rose is just perfect and of course chocolate plastic is much better than fondant!
Well done.The photos are beautiful the tutorial is quite clear as well.
I be proud if one day I´ll be able to make something like that
Fab recipes, you always inspire me to get cooking. :)
There is a little something on my blog for you.
Erin
Nice step by step. I'd like to try this sometime. I think I'd be afraid of fingerprints. I can see the fingerprints on the roses in the close up pics. Is there any way to make those disappear? Do you notice them in person?
beautiful!!!! Do you know how to make buttercream roses? I can't seem to figure that one out yet!!
wow this is great. I was waiting for this tutorial . The rose is perfect. Thanks alot. :-)
What a great tutorial! I love it! I'm still so in love with the mini pumpkin cheesecakes, that I'm thinking I just have to make them for thanksgiving this year. I just need to find a mini cheesecake pan. Hmmm. Better start searching. :o) Thanks for this post, it was great! ;o)
Wow, this is perfect. I will come back and read it tomorrow as well as it is late now and can't concentrate any more.
Hey everyone! I hope you do try making stuff with chocolate plastic! it's so fun! You can't go wrong because you can always eat it!
Recipe Girl,
Yes, my macro lens caught my fingerprints! That is a necessary evil when making these handmade things. It's got that "handmade" touch! However, if you want to avoid fingerprints, you can wear surgical gloves. That being said, with gloves, it's a pain to manipulate tiny things and you don't get a "feel" for the medium. Remember, I'm using a macro lens and people don't ordinarily look at these decorations that closely. It's kind of like looking through a magnifying glass using macro. At typical plating distance, you wouldn't notice it. You'd have to have the rose up close near your face to see the prints.
Cakewardrobe,
Yes! in fact, I first learned how to make buttercream roses (using the Wilton method) after I took a series of intensive cake decorating courses. When you learn the anatomy of making a buttercream rose, then everything else seems easier after that. It's just a lot of practice. You can do it. Just get some practice buttercream and keep trying. I recommend a course if you haven't taken one because you get cool tips from the pros on how to work it.
This is a great tutorial!!
I must try to make some of these pretty soon!
Thank you
Fabulous and helpful post. Your roses are spectacular!
Amazing chocolate rose!
Your roses are absolutely stunning! Thank you so much for sharing your method for making them. I would love to try this!
I remember my mom and I making these for easter one year when I was about 4. I had forgotten about them! Such a simple and elegant way to dress up cakes and such.
Yours look gorgeous. Thanks for the tutorial!!!
Gorgeous and perfect chocolate rose!
Thanks for the tutorial! Your rose came out marvelous!
~ingrid
ooh my, u make it look so easy! :)
Making a rose has been so difficult for me, I have not attempted this in years and years.. oh you make it look so easy... gosh I admire you.
I hope you did not mind me blog rolling you = )
girl japan,
if you've done it before, you can do it again! it's like riding a bike! no i don't mind being on blog rolls...the more the merrier i guess!
How beautiful!!
Just beautiful! I love to dabble with chocolate too! Your rose is exquisite! I have not tried the rose yet!You seem like a person with lots of patience, a born teacher!
Wow, very impressive! it looks perfect my dear.
I could never do that with my big, ugly fingers. :-)
wow this is awesome and they look so natural. Great step demo.
beautiful!
Wow, You really make it do look soo easy and thanks a million for being so super generous! Many people nowadays are not willing to share or teach their talents without a fee! You surely have a gr8 big generous heart!! Thanx a mill! I'm def gonna try this!
thank you for the kind words, people!
cake-a-licious,
I suppose it's the teacher in me. I don't mind sharing knowledge because I think it makes the world a better place. I have a few people I know who are loathe to share "secret" recipes. I poo-poo on their secrets as an indication that they're insecure about their abilities. If someone has to keep a recipe a secret so their food will always be "better", what's that saying about that person? hm.
Hey der, its me again, i tried making the plastic chocolate and it is truly divine in taste...the only prob i had and was wondering if you had solution was i cant get my roses to stay once i do them...the chocolate seems so floppy! I stay in very humid conditions, ( on the coast in South Africa), could that be the rpob? Do you think if i had to add tylose powder or something as with fondant if it would work?? Thanx for the help once again!!
I'm glad your chocolate roses are yummy! Yes, I can see humid conditions being a problem as Manggy (Mark)who lives in the Philippines has the same problem using plastic chocolate. I don't know of a ready solution other than to make these in an air-conditioned environment. I am unfamiliar with tylose powder as I have never had to use it here. I would take a chunk of the plastic chocolate if I were you, and add some tylose powder and knead it in to see if it holds up better. Just experiment. Here in Vancouver, I would be inclined to use cocoa powder to dust my hands...if I had a problem with stickiness. However, I don't know if that'll solve the floppy chocolate syndrome. Good luck!
Thanks so much for the tutorial! I prepared some roses today. Fantastic work you have here in your blog! Thank you once more!
chriesi,
thanks for the kind words...glad to have helped! come visit again!
Hi. I'm from Malaysia and I work with plastic choc a lot.
The key is to work in a really air-conditioned environment. I tried doing it in a normal kitchen but ended up piping the plastic choc!
wow pretty
its how i make clay roses too, i never new you could do it with this plastic chocolate stuff. Cant seem to find it in supermarkets here- is there a recipe i could use?
starlight 150,
Just check out my Mini Chocolate Pumpkin tutorial for the recipe (there's a link in this post) or
http://cakeonthebrain.blogspot.com/2008/10/playing-with-chocolate-mini-chocolate.html
hey this recipe is great! thanks for posting it
for people from the uk - i used golden syrup and it worked fine, although got a tad sticky but dusting it with a bit of cocoa powder kept it under control
Thanks again
hello,
My name is Adriana I live in Brazil ... this rose is very beautiful ... you have the recipe of chocolate mass that used to make the rose? can I go?
thank and congratulations on your blog
sorry for the mistakes of .. rrs English
Rafaela,
Just click link to the Mini Pumpkin tutorial in this post or look at it in this link
chocolate plastic
good morning
Happy Valentine Day..
I baked two layers of double chocolate cake and frosted with chocolate ganache, and I took your recipe for the chcolate roses and this is my first time doing these gorgeous roses.... Thanks so much for your posting.. really helped.
Cheers From North Bay!!!!!!!!!!!
Arlette,
It's fun playing with the chocolate, isn't it? Kind of brings you back to childhood days and playdough!
Your tutorial is absolutely brilliant! I had been searching several sites for chocolate roses but the explanations were not very clear. Loved your step by step comments and pictures. It was very helpful! Good job!
Jenny,
glad to be of help!
What is the best way to attach these to fondant on a cake?
Taeryn,
I would imagine that any buttercream you had under your fondant would help attach it to your fondant on top. It would probably be okay to just place the roses on top without using anything to "glue" it on the fondant if you don't have to transport it. It would just rest on the top of the cake.
Wow - thanks for the great, detailed instructions on how to make these crowd pleasers. I recently made a couple cheesecakes for family fourth of July picnic, and everyone was so impressed - and they're so SIMPLE to make!
Michael,
glad everything went so well! Happy July 4th!
Could you please tell me a substitute for corn syrup please... could I use glucose syrup???? Thanks heaps
Loucraig,
I have never substituted anything else for corn syrup, but I looked it up on Joy of Cooking and there are various substitutions you can try for baking purposes (like treacle, honey,etc.) Since you're not baking this rose, I think you could indeed try liquid glucose in equal proportions and see how it works. Make a small batch first! I believe things like honey or agave will be too runny and treacle may impart a strange/strong flavour. Do tell how it turns out! I think it should work though.
http://www.joyofbaking.com/IngredientSubstitution.html#ixzz0svK52VUR
hello^^
i love this chocolate rose
and thew wonderful photography
by the way
may i use the finished photo?
Anonymous,
thanks for the comment!
I don't know who you are? Where will you be using the photo? if you're posting it on a personal blog then the general rules for accreditation should apply. You need to identify the source(me)of the picture and link to my blog and/or post. It's always nice if you leave a comment telling me you've used it and linked it so I can check out your blog too. It makes for a friendlier, greater food blogging community! If you're using the picture for commercial purposes, then we'll have to discuss it further. You can send me another comment here (the comments on this particular post are moderated and will not be shown publicly automatically)with your email & name and I'll get in touch with you privately about it.
You are truly, truly inspirational. Thank you so much for sharing this. I agree with you. Foods--especially sweets--are made to give people the feeling of happiness, and keeping "secret" recipes completely defeats the purpose. =D All of us appreciate the teacher in you.
Btw, your rose looks so realistic that it's almost like you snipped off a rose from my rose bushes! I vow to practice until I can make it just as well! ^-^
--Suzuki
Suzuki,
thank you for the kind words of encouragement for what I'm doing here! Have fun practicing!
Hi, I would like to know if the rose become chocolate again (if it dries out or it keeps moist). Thanks and congratulations from Brazil!
Hi Brazil,
I don't know exactly what you mean by "becomes chocolate again" because it IS chocolate. The malleable toffee-like consistency is maintained for a long time because of the corn syrup. The rose should maintain its form at room temperature and will not "melt". I do think that if you live in a very hot, humid climate, that you should be making and storing this rose in an air-conditioned environment.
Hey I have currently gotten the baking addiction and I wanted to know if you had any good chocolate cakes for thanksgiving. Every year I go to my grandparents house and they have requested that I bake them a cake. I have thought of a few ideas like roasting some peacons and adding them to the batter and decorating it with peacon buttercream with a patch of your adorable chocolate pumpkins. If you can please help me I'm having a bakers block haha
Blocked Baker,
My favourite easy chocolate layer cake recipe comes from the Barefoot Contessa. Here's a link to it chocolate layer cakeIt's a cinch to make and yields a lovely moist crumb. I would frost it with Martha Stewart's recipe for Swiss Meringue Buttercream. It's a winning combination!
Lovely roses! Made them to put on a triple layer chcoolate mousse cake and though they did not turn out as beautiful as yours ( I had to make some ingredient substitutions), but they still made an impact! Thank you so much for sharing!
Hi Cakebrain!!:):)
I just want to tell you how grateful and thankful i'am for being able to find your blog and for posting this step by step tutorial! Unfortunately i love in a hot climate soo i am having a hard time attempting to make these:). I already made some chocolate plastics and got instructions on how to make them, how ever your instructions are clearer for me, thank you for sharing your knowledge:) i'm sorry but expect to be bombarded by lots of questions on different topics from me!:):). Your pictures and roses are amazing:)
-Casey
As I live in the UK is it ok to use honey! or treacle! As maple syrup we don't have here? I have tried with treacle small amount as a trial. I used 4oz chocolate and 2 spoons of treacle, mixed through and fridged till hard couple hours, When I come to use all I got was it was crumbling and not able to do any thing with it? please help. All info will be appreciated thanks. Rdgs Barry
Barry,
You can try Karo or try to make your own corn syrup. I think that corn syrup's consistency is necessary; not the sweetness. Corn syrup does not crystallize and honey and other liquid sugars do.
Do you have a baking supplies store in the UK? Pastry chefs must be able to get something similar. Can you order online? Also, if you can find glucose, this might prove to be a possible substitute.
A previous commenter from the UK said she used golden syrup and it was okay...but on the sticky side so she used cocoa powder to dust
I just made these today and they turned out beautifully! Thank you for the awesome tutorial!
Thank you for the tutorial. Quick question. How long do the roses last after making them, andhow should they be stored?
Store the roses in an airtight container. I think they should last a week. I don't recommend refrigeration.
Hello Cakebrain! I wanted to thank you for posting this tutorial. I just used it as a guideline to make a pendant out of wax. I just started learning wax carving and casting, and I really wanted to create a rose. Your steps really helped-- of course, I had to alter the directions as I used primarily fire to soften the wax sheets. But it came out beautifully. Thanks again!
Raquel,
How nice of you to comment and let me know how your wax rose turned out! I'm glad my instructions were helpful!
Just want you to know that even years later, your tutorial is still helping people out. I'm so glad to have found it! Despite not being artistically inclined (I might actually have negative skill in this regard) I wanted to try to make something home-made for my mom's birthday. And then I found this, and the way you broke it down gave me the courage to try. I'm so surprised how lovely they turned out, and how easy they were to make! That was all you, by the way, because without guidance, my projects tend to look like a third grader's. I think I'll try white chocolate and food coloring next! Thanks!
Tara,
thank you so much for the kind words...indeed it has been quite a while since my chocolate rose tutorial post! When I did it, chocolate plastic wasn't too common on food blogs and I didn't see anything online explaining how to do it. Only professional bakers/pastry chefs seemed to know how to make these roses. Now everyone can make them. Cool! Your comment made my day! Hope you have a blast making the white chocolate ones!
This is absolutely gorgeous. I also put in the center of the rose a piece of candied fruit soaked in cointreau for extra flavor. Heaven! Woohoo!!
Adrien,
that sounds fabulous!
Hey Guys to avoid the fingerprints on the petals the easiest way is not wearing a glove it actually a hindrance while making them , well you should roll them on a small piece of plastic where actually you can press them on their edges which gives much beautiful effects of a real petals, press a small ball of plastic choc on a sheet of plastic transparent sheet then remove & attach them to the flower this way there are no finger prints...
thanks
I love this tutorial. I'm a beginner in baking and in business of cupcakes. I love you works... It was a truly inspiration. Keep it up!
http://youngmamasdelight.blogspot.com
I was inspired by it! Great tutorial and I hope more tutorials to come that I can add with my skills too. I'm just a beginner in baking and I wanna learn more from you. Keep it up!
http://youngmamasdelight.blogspot.com
GOEGEOUS ROSE!
Post a Comment