 |
| Christmas in July Cookie Contest! |
 |
| Christmas Cookie Box |

Ah how time has passed and my food blog has morphed into something else. The 1st year of blogging was bumpy. I was still using my tiny Sony point and shoot camera. I didn't bother to photoshop and left all the time stamps on my pics. I look back at that first year and cringe but I think it's important to leave posts as they are rather than update and fix them because I like to see my growth. I also went through a phase where all my food pics were with my Nikon D700 and macro lens in high res and I spent several hours photoshopping.
Today I have ditched the expensive lenses and opt for my iphone5. Yes, I have lower res pics because high res pics don't really matter especially since the episode of everyone stealing my Coconut rice pudding brulee picture and attributing it to another recipe. After several months of trying to fix it on Pinterest, Google, Facebook and various food sites by reporting it as an image stolen from me, I gave up. I even watermarked my pics for a while and today I have simply given up. I'm just not going to put high res pics online. I have the ability to, and want to, but it isn't worth the grief. Truthfully, the picture wasn't that great and today I could do way better. But, it is the principle of the thing. It's mine dagnabbit. To this day there are several sites that still have my picture taken from my post and used for another recipe. It peeves me still but I've moved on.
For the recipes for my other Christmas Cookies, click HERE
 |
| ONE recipe: two totally different looking cookies! |
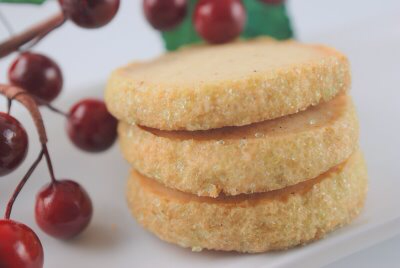 |
| Vanilla Pod Butter Cookies: the one recipe you need to make it all! |
NB: if you cannot get your hands on a fresh vanilla bean pod, substitute with 1 teaspoon vanilla bean paste or pure vanilla extract...it'll taste good but of course it won't be exactly the same.
- 1 cup (2 sticks) unsalted butter, softened
- ¾ cup granulated sugar
- 1 large egg plus 1 egg white, beaten
- 1 whole vanilla bean pod (for grinding with the sugar)
- 2 ½ cups sifted all-purpose flour
- ¾ teaspoon coarse salt
- ½ cup fine sanding sugar
- Split vanilla pod if it is fresh and scrape out the seeds for creaming with the butter. Place empty pod in food processor with granulated sugar to grind. Sift out the larger chunks of the bean. If you have a stash of dried vanilla pods, use that and supplement with 1 teaspoon vanilla extract.
- Put butter and vanilla seeds into mixer with paddle attachment, mixing until seeds are distributed thoroughly. Add the granulated sugar/vanilla pod mixture into the bowl and continue beating on medium speed until pale and fluffy, about 2 minutes. Mix in whole egg and vanilla extract, if using. Reduce speed to low. Add flour and salt and mix until combined.
- Halve dough; shape each half into a log. Place each log on a 12-by-16 inch sheet of parchment. Roll in parchment to 1 ½ inches in diameter, pressing a ruler along edge of parchment at each turn to narrow log. Transfer to paper towel tubes to hold shape, and freeze until firm, about 1 hour.
- Preheat oven to 375ºF. Brush each log with egg white; roll in sanding sugar. Cut into ½-inch thick rounds. Space 1 inch apart on baking sheets lined with parchment. Bake until edges are golden, 18 to 20 minutes. If you want great flavour, go golden-brown and bake longer. It's a fine line between browned-butter flavour and burnt so watch it! Let cool on sheets on wire racks. Store in airtight containers at room temperature up to 3 days.

TIFFANY SNOWFLAKE COOKIES
For intricate snowflake cutouts:- Halve dough; create discs and wrap one in plastic wrap.
- Take the other disc and roll out the dough to the desired thickness (usually 3-5 mm) out between two pieces of parchment paper. I place the whole sheet of parchment/rolled-out cookie dough onto a plastic cutting board and pop it in the refrigerator to firm up (about 30 minutes).
- Take other disc out and roll out as above. Pop that into the refrigerator to firm up too.
- When the rolled dough is firm enough, take it out and use your snowflake cutters to make as many cuts as possible. Transfer to a parchment-lined cookie sheet. With the tiny cutters, you can now make more cuts into the cut cookies on the parchment. This way you won't have to transfer delicate snowflakes and avoid tons of frustration.
- Do leave a proper amount of space between the cutouts (about 1 inch) to allow for a little spreading. Lift off the surrounding dough carefully. You may need a pointy knife, thin spatula or other such tool to assist you in this endeavour. I use the tip of a plastic kiddie chopstick to poke out the dough from tight crevices. If you leave marks, you can always flip the cookie upside down onto the parchment to bake.
- Place snowflake cookie-laden cookie sheet back into the fridge to firm up again before baking.
- Ball up the remaining dough and do it all over again.
- Meanwhile, preheat the oven to 350 degrees F. Bake the cookies on the middle rack until golden, about 18-20 minutes--more or less depending on the size of your snowflakes. Just keep an eye on the first batch for an indicator.
- Decorate with royal icing, if you wish (see below for recipe and instructions)
TIFFANY-COLOURED ROYAL ICING RECIPE
- 3 tablespoons Meringue Powder
- 4 cups (about 1 lb) confectioners' sugar
- 6 tablespoons warm watter
- blue or teal gel food colouring
- toothpicks
1. Place all ingredients into a stand mixer and beat until stiff peaks form. (7-10 minutes at low speed with a heavy-duty mixer, 10-12 minutes with a hand-held mixer)
2. Place 1 cup of the icing in a small bowl; cover and reserve (this will be for piping the white lines on the snowflakes).
3. Tint the rest of the icing with blue or teal food colouring. Use a toothpick and gradually add gel food colouring until you get the desired tint of the special jewelry box you and I know very well. Beat well after each addition of colouring.
3. Thinned Royal Icing: To thin for pouring add 1 teaspoon of water at a time and beat with a spatula by hand; checking the consistency each time. There are two types of consistency you'll need to make for the Tiffany Snowflakes. I will direct you to this wonderful post about flooding and piping consistencies.
In total you'll need 3 bowls of icing: one white piping bowl, one blue flooding bowl and one blue outlining bowl.
4. Outline your cookie perimeters with the blue outlining bowl. This consistency should be stiffer than your flooding bowl. Then use the blue flooding bowl to cover your cookies. Allow the cookies to dry thoroughly.
5. With the white piping icing, pipe decorations on top of the dried flooded icing. Be creative. I like to use straight lines and add dots of icing because it's easier on my hands.
No comments:
Post a Comment